No products in the cart.

Tools and Procedures for Forensic Investigation of Storage Media
Deivison Franco, Cleber Soares, Daniel Müller, and Joas Santos
Digital data and in particular data storage play an important role in everyone’s daily lives. Hence, traces of digital data or evidence that incriminates or acquit a defendant is increasingly found on personal computers, hard drives, USB sticks, CDs, and DVDs. First, the article will discuss forensic duplication, an essential procedure for the preservation of material evidence. Thereafter, we discuss procedures and processes to retrieve and seek data relevant to the investigation. Finally, we discuss techniques for extracting potentially relevant information from underlying and often hidden Windows operating systems, solving a case.
A typical example of different investigation scenarios is: "A notebook of the victim was also found in the house of the lover's sister", or "after conducting a search and seizure operation, the computers used in the scenario would be analyzed to find other possible user involvement."
The ubiquity of technology created an open platform to discover a different type of trace, in which you can find the most diverse types of personal and professional information on alternative storage media. Digital storage media, in any form, represents data essential for the interpretation of various types of investigations, such as
- The data embedded in an image can reveal the author of pornographic images involving children;
- A document containing an internal memo may serve to prove an accusation of workplace bullying;
- Electronic messages can prove that certain people involved in currency evasion maintained frequent contact.
Storage media is also known as secondary or auxiliary memory and consists of a nonvolatile memory type, that is, the data written there is not lost when the computer shuts down. Figure 1 displays the most common forms of presentation of storage media: hard disk, solid state disk, USB stick, memory card, and optical media (a category that includes CDs, DVDs, and BluRays).

Figure 1. Hard disk (a), solid-state disk (b), USB stick (c), SDHC memory card (d), and DVD-R (e).
This article will focus on hard drives since it is the type of media most examined by Federal Criminal Experts. Techniques discussed here may also be used in the analysis of other digital storage mediums. This article will also focus on postmortem analysis of the media in which the expert would find the computer would be turned on. Finally, the article is divided into the first 3 phases of the storage media expert examinations, shown in Figure 2.

Figure 2. Phases of computational media forensic examination.
The first phase, Preservation, has as its main objective to ensure that digital evidence does not change during the examination. The next step, Data Extraction, aims to identify the files or fragments of files present in the media. In turn, the purpose of the third stage, Analysis, is to identify information useful to the fact that it is under investigation in the recovered files. And finally, the Presentation stage is how the expert will formally report his findings. In other words, it is the report or other technical document that will be prepared.
Forensic Programs
There are several application suites that perform expert analysis of storage media. Some are able to act at all stages of the discovery, while others attend only a few. Commercial options include EnCase Forensic from Guidance Software, Forensic Toolkit (FTK) from Access Data, and X-Ways Forensics from X-Ways.
There are also excellent free forensic software options. One of the main ones is The Sleuth Kit (TSK) and it is actually more than just an application. TSK is a set of tools that work via the command line and perform the most varied tasks, ranging from obtaining information about the operating system to create a database containing the metadata of files extracted from a media source. Its interfaced version is called Autopsy and is shown in Figure 3.
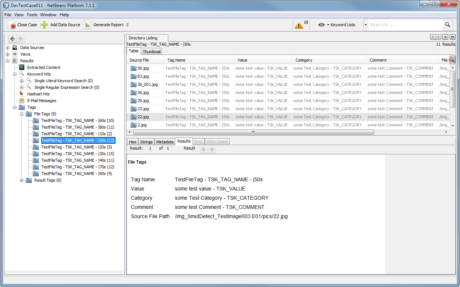
Figure 3. Autopsy screen.
The Federal Police uses its own application called Indexer and Digital Evidence Processor (IPED) because it has very particular demands, which are not available in existing tools in the market. The program works in conjunction with several other free code applications, such as TSK. The IPED was developed by a team of Federal Criminal Experts, headed by Luís Nassif, and also used by other agencies, such as the state technical-scientific police, civil police, public prosecutor's office, and the Federal Revenue Service of Brazil. Figures 4 and 5 show the IPED processing and analysis screens as an example.
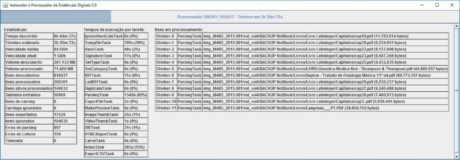
Figure 4. IPED processing screen.
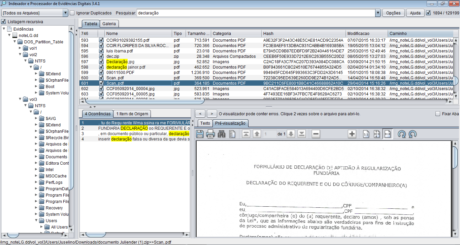
Figure 5. IPED analysis screen.
More important than using the mentioned apps is knowing what they do "under the hood". The expert must be able to reproduce the same result from different software and explain in court the way in which he came to a specific conclusion.
To do this, you need to have a solidified knowledge of how the technologies involved work, how data is arranged in the media, and how programs interpret and present information.
Preservation
The procedures relating to the first stage of the expert examination begin with the documentation of the material received. This is the time to describe the characteristics and the state in which it was received from the media. For example, with hard drive investigation, the following characteristics make it possible to identify the manufacturer name, model, serial number, and nominal capacity. The receiving status may contain some non-original characteristics of the equipment, such as scratches and dents. A good practice is to photograph any data sources and relevant equipment received.
The preservation phase also has a chain of custody process, which deals with a chronological record of evidence handling, from evidence collection to the end of the procedure.
Digital traces should be treated with the same care as traces found at a crime scene, such as blood stains and projectiles. Although quite reliable, storage media is subject to failures from mechanical shocks, excessive humidity, or aging.
However, storage media have a quality that differs from traditional traces: the possibility of being reproduced entirely to another storage device. This prevents the original media from being over-manipulated during scans, which can harm the integrity of the data. Thus, whenever possible, the analysis should be conducted on the copy, so that if any accidental changes occur, the entire process can be started again from the original media.
The exact copy of the data, bitwise, from suspicious media to another storage device is called forensic duplication or mirroring. During this procedure, the information contained in the questioned media is copied without concern for the file system or how and where the data is stored. Unlike what would happen during the traditional backup process, for example, forensic duplication is also copied, in addition to the allocated data, deleted files, and space located outside the boundaries of partitions. The guarantee that the copied data is exactly the same as the originals is made with the use of hashes algorithms, the results of which will be compared to the end of the copy.
Destination of Data
One of the decisions that must be made when planning forensic duplication is about the destination of the data. In this respect, there are two types of mirroring: from media to media and from media to image file.
In media-to-media mirroring, data is copied to another storage device, whose capacity, in the number of sectors, must be equal to or greater than the original. In this way, sector 0 of the source unit is copied to sector 0 of the target device, and so on. However, to ensure that pre-existing data does not contaminate the new analysis, the target device must be "sanitized" before copying.
The sanitization process, also known as data wipe, consists of overwriting, each media sector will receive the copy with 0s, 1s one or more times random data, or even predefined bit sequences. NIST (National Institute of Standards and Technology), a U.S. agency that is usually compared to the Brazilian Inmetro, has developed guidelines for the hygiene of media and other computer devices, which is an excellent guide on the procedures. Some examples of how to perform this procedure in Linux environments are shown later in the article when forensic duplication software is covered.
Media-to-media duplication is a costly method because it requires a target disk for each source disk and requires greater human intervention due to the multiple disks that will be manipulated. Therefore, it is recommended to adopt the media-to-image file mirroring method. This procedure is currently the most used in the forensic community. In this arrangement, the data is copied to one or more files that will have the same bit sequence and the same size as the original disk and can be stored on any media type. Thus, you get the flexibility to work with more than one trace simultaneously.
Figure 6a illustrates three media mirrors for media, and Figure 6b shows the same duplicate data through the media-to-image file approach.
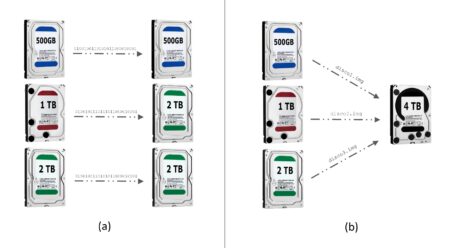
Figure 6. Media mirroring for media (a) and media for the image file (b).
Forensic Duplication Equipment
A forensic copying procedure can be performed with the use of specialized equipment or through ordinary computers, aided by duplication programs. However, regardless of the medium you choose, it is essential to ensure that the original media does not get changed during the procedure.
To meet this requirement, one of the solutions is the use of specialized forensic duplication equipment, which is widely used in field procedures, such as during the execution of search and seizure warrants. Usually, because they are embedded devices, they have reduced dimensions and optimized features, becoming more agile and portable than ordinary computers. Another essential feature of this type of hardware is the presence of at least one write-protected port to connect the original media, preventing any data from being inadvertently altered. Figure 7 shows Tableau TD3, from guidance software, forensic duplication equipment used by the Federal Police.
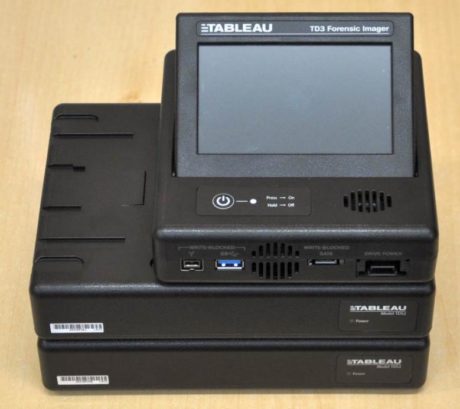
Figure 7. Tableau TD3 forensic duplication equipment.
General purpose computers, on the other hand, although not designed exclusively for duplication, bring a wider range of possibilities to the expert. Because they are modular and have a larger number of interfaces, they allow the use of several different types of storage media, both as source and destination. They enable, for example, the duplication of multiple USB sticks for image files stored on a NAS equipment. It is also possible to automate the treatment of large volumes of traces through the elaboration of scripts. Finally, there is the freedom to choose the mirroring software and operating system that will be used.
Regardless of the duplication equipment, the disks that have Parallel AT Attachment (PATA) or Serial AT Attachment (SATA) connections, shown in Figure 8, chosen, require additional care when duplicated.
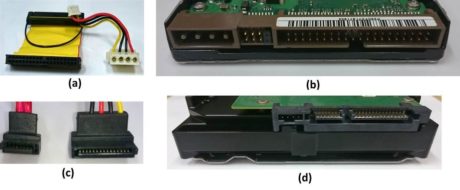
Figure 8. PATA cable (a), PATA connector (b), SATA cable (c) and SATA connector (d).
This attention is required to identify the presence of latent areas known as Host Protected Area (HPA) and Device Configuration Overlay (DCO). Once present, these areas will make the disks have a smaller capacity than they actually have. Dedicated duplication equipment typically detects and disables these areas automatically. Traditional computers, on the other hand, can use the hdparm utility, present in Linux systems, to identify the HPA and DCO areas, as shown below:
| hdparm -N /dev/sda
hdparm --dco-identify /dev/sda |
Note: Examples of this article consider that the device "/dev/sda" represents the media questioned.
Figure 9 shows a disk with HPA configured, where you can see a disparity between the number of sectors visible to the user and the actual number.

Figure 9. Disk with hpa area enabled.
The disk examined in this example has 976773168, although they are accessible to the user only 976771055. This problem is fixed through the same hdparm program, and it is necessary to inform the actual amount of sectors as the second parameter. Figure 10 shows the command used for the temporary deactivation of HPA.

Figure 10. Disk with hpa area disabled.
Figure 11 shows another disk on which the DCO area is enabled.
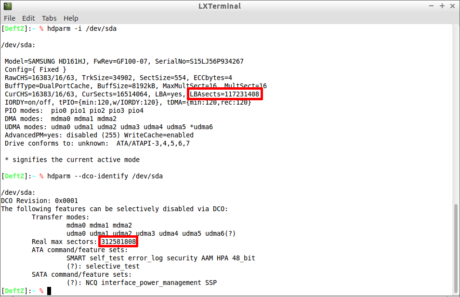
Figure 11. Disk with dco area enabled.
It is possible to observe that the result of the first command in Figure 13 indicates the existence of only 117231408 sectors, while the second shows that there are 312581808 sectors in reality. This number is corroborated by the label of the hard disk itself used in this example, shown in Figure 12.
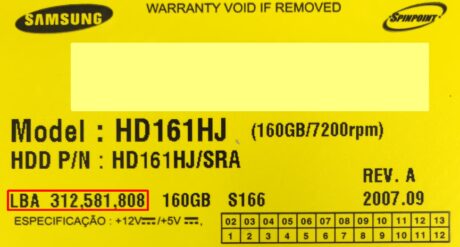
Figure 12. Hard drive label.
Finally, disabling the DCO area also uses the hdparm command, as below:
| hdparm --yes-i-know-what-i-am-doing --dco-restore /dev/sda |
It is worth noting that it is necessary to restart the computer or reconnect the media to it for the command to take effect. It is also important to warn that, as the use of the "-dco-restore" option may cause loss of information stored in the media, it is suggested that its use be carefully evaluated by the expert. And if disabling the DCO area is essential, it is recommended that you make a prior copy of the original media.
Forensic duplication programs
Developed in the 1970s, originally for the purpose of converting and copying files, dd is the oldest program used for duplication still in activity. It remains largely in use, specifically for easy access, as it accompanies the standard installation of most Unix-like systems. Its interface is through the command line, as can be seen in Figure 13, and its options are configured through arguments, explained in Table 1.

Figure 13. Example of using dd.
Table 1. Arguments used by dd in the previous example.
| ARGUMENT | DESCRIPTION |
| If if | Input file: Linux considers a file all that can be handled by the operating system. |
| of | Output file: In the example above, file.img is the target of the data in the image file format. |
| Bs | Block size: For efficiency, hard disk controllers transfer data into blocks. Because most disks have 512-byte sectors, the size of the transferred block is typically a multiple of this value.
The duplication is faster when values greater than 512 bytes are set to the "bs" parameter. The optimized value will depend on several factors, such as the kernel version, the machine bus, and the characteristics of the disks. |
| Conv | The "noerror" option prevents dd from stopping if a read error occurs. The "sync" option fills with zeros on the target that could not be read at the source to ensure that the "if" and "of" sizes are the same. |
Because it is a program with a broad purpose, dd lacks specific characteristics for forensic scopes, such as real-time hash calculation, a progress meter, and the ability to segment the output image into multiple files. From this need came dcfldd, a fork in the development of dd, in which other functionalities were added. It was developed in 2002 by the Forensic Computer Slab (DCFL), which conducts media examinations associated with investigations conducted by the U.S. Department of Defense (DoD). However, since 2006 it has not been updated.
Inspired by DCFLDD, dc3dd can be considered its successor. It emerged in 2008 and is maintained to this day by the Cyber Crime Center (DC3), also of the DoD. Figure 14 shows an example of using dc3dd. The arguments are explained shortly thereafter in Table 2.
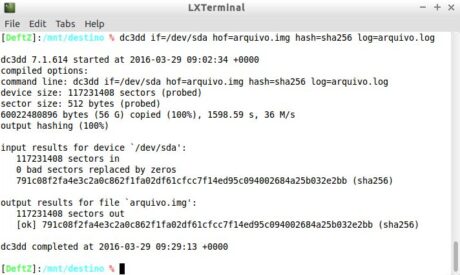
Figure 14. Example of using dc3dd.
Table 2. Arguments used by dc3dd in the previous example.
| ARGUMENT | DESCRIPTION |
| If if | Sets the device that contains the questioned media. |
| Hof | Sets "file.img" as the destination of the data, calculates its hash, and compared it with the hash of the source using the algorithm defined in the next parameter. Figure 11 showed that the hashes of the input device and the output file were identical. |
| hash | Calculates the hash of the source data using the specified algorithm. In the example, the SHA-256 was used. |
| log | Defines "file.log" as the repository in which the summary of the actions performed by the program will be written. Its content is the same as shown in the application output itself, which was shown in Figure 11. |
The attentive reader certainly noticed in the previous figure the absence of the parameters "bs=32K" and "conv=noerror,sync", used in dd. Dc3DD adopts 32K as the default block size and, in addition, automatically fills the output with zeros when there is a read error on the source device.
The next duplication program is called ddrescue, whose main difference from the previous ones is to be an expert in the recovery of data stored on media that has errors. ddrescue performs a sophisticated algorithm whose purpose is to cause the least possible damage to the source device, adopting the strategy of recovering the intact parts first, leaving them compromised last. This approach maximizes the final amount of data retrieved from a dying device.
The following examples show, respectively, how to copy only the error-free area and how to recover the data contained in the damaged sectors.
| ddrescue -n /dev/sda image.dd image.log
ddrescue -r 3 /dev/sda image.dd image.log |
The parameters are explained in Table 3 and the running software is shown in Figure 15.
Table 3. Arguments passed on to ddrescue in the previous examples.
| ARGUMENT | DESCRIPTION |
| -n | Ignore the bad sectors. |
| -r | Number of attempts in case of error. |
| /dev/sda | Source device. |
| image.dd | Target file. |
| picture.log | Log file name, also called a map, that is used to track duplication progress and to display the process summary at the end. |

Figure 15. First step of ddrescue running.
The log file is also useful for resuming the copy when it is inadvertently interrupted, as happens when there is a power outage. To resume it, simply repeat the last executed command, provided that obviously the log file was reported during the first run.
Figure 16 shows a log file created by ddrescue, with lines highlighted in red being explained in Table 4.
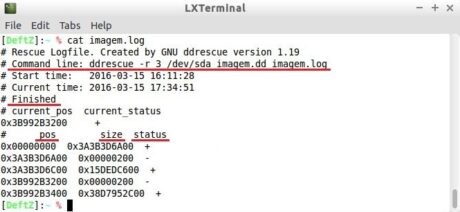
Figure 16. Example of the log or map file used by ddrescue.
Table 4. Explanation of the log file created by ddrescue.
| PROMINENCE | DESCRIPTION |
| Command line | The command used in the duplication process. The on-screen example shows that up to three attempts have been made to recover the defective areas. |
| Finished | Indication that the process has been terminated. |
| Pos | Offset or starting position of the data block, in number of bytes. |
| Size | Data block size, in bytes. |
| status | Indication that the data block has been copied or not. The symbol "+" means that the copy occurred successfully, while "-" represents that it failed. |
From the example provided, we can conclude that two blocks of 512 (0x00000200) bytes each, from the offsets 250101983744 (0x3A3B3D6A00) and 255972815360 (0x3B992B3200), could not be copied. As the process came to an end, the sum of the values contained in the last row, 255972815872 (0x3B992B3400) and 244135046144 (0x38D7952C00), must be equal to the size of the duplicate media, that is, 500107862016 bytes.
Those who choose not to perform the calculations can use the ddrescuelog application, which accompanies ddrescue. When called with the "-t" option, the program will show a summary of the copying process, including the amount of data retrieved and how much was lost, as shown in Figure 17.
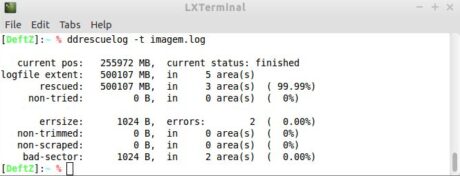
Figure 17. Summary of the copy process using ddrescuelog.
Windows fans can also use some of the tools mentioned, as both dd and dcfldd have versions that run on the Microsoft operating system. The main difference, however, is in how media connected to the computer will be referenced.
On Windows systems, each physical or logical drive connected to a computer is assigned a device object, referenced through a specific nomenclature. For example, to duplicate the first available hard drive using dcfldd, you can use the following command:
| dcfldd if=\\.\PhysicalDrive0 of=image.dd |
If the option is to duplicate a logical drive, such as "C:", the command to be used is:
| dcfldd if=\\.\C: of=image.dd |
It is important to note that previous commands need to be executed with administrative privileges. The identification of the drives present in a system can be done with the use of the diskpart utility, which also needs administrator permission.
For those who prefer to work with a graphical interface, there are dozens of other mirroring programs available, such as FTK Imager, also from Access Data. Figure 18 shows the program during the duplication of the first physical device (PhysicalDrive0).
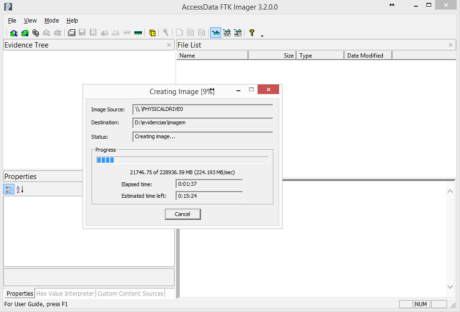
Figure 18. Relationship of physical devices from the diskpart utility.
NIST is the pioneer in the validation and verification of forensic tools. For this purpose, the institute maintains a project called CFTT (Computer Forensics Tool Testing), which allows the evaluation of the results of several different programs.
Finally, you must access the image file created in this step. Several of the programs already mentioned can interpret the format of an image file, but if the expert uses the Linux platform, he can use the mount command, according to the syntax shown below and explained in Table 5.
| mount -o ro,loop,offset=2048 -t ntfs file.img drive_c |
Table 5. Syntax of the mount command.
| ARGUMENT | DESCRIPTION |
| -the | Defines the mounting options.
ro: read-only mode. loop: Indicates that the image file is treated as a storage media. offset: partition start, in bytes. |
| -t | Partition file system. |
| image.dd | File name image. |
| drive_c | Directory in which the image file will be mounted. |
Both the offset and the file system type of the partition can be determined by the mmls program, previously mentioned.
Forensic Operating Systems
There are free and forensically biased operating systems that bring with them a set of software aimed at expert work, such as the aforementioned TSK. In the authors' opinion, the Linux distributions that deserve the most prominence are C.A.IN. E (Computer Aided Investigative Environment), DEFT (Digital Evidence & Forensics Toolkit), and SIFT (SANS Investigative Forensic Toolkit).
The first two, work as live DVD/USB, that is, do not need to be installed on a hard drive, since the operating system is loaded from a removable drive and runs from RAM. Unlike general-purpose operating systems, these distributions do not automatically mount media found on the bus. Figure 19 shows the DEFT distribution, with the expanded forensic duplication menu.
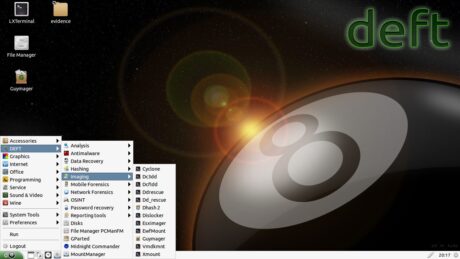
Figure 19. Forensic distribution deft.
In turn, SIFT does not function as a live distribution or is not suitable for duplicating questioned media, since it does not give special treatment to media connected to the computer. Its focus is the phases of data extraction and analysis, and it is also indicated for the treatment of information security incidents.
On the Windows systems side, WinFE (Windows Forensic Environment), which is a forensic system based on the pre-installation environment of Microsoft's operating system, known as WinPE, is worth mentioning. WinFE is an excellent choice for experts who have a preference for tools that only work in Windows environments. Like some of the Linux distributions mentioned, WinFE also avoids automatic mounting of the questioned media.
Data Extraction
This phase aims to identify the active files, the deleted files, and even those that have only fragments of their original content. This is also the stage in which files inserted within other files, known as archives, composite files, or repositories are located. Some of the formats that fall into this category are zip, RAR, and ISO files.
Data extraction begins with the identification of the partitions contained in the media or image file, now that duplication has already been performed. The volume layout is analyzed by looking for unallocated sectors, which can store data from a previously deleted partition or information that may have been purposely hidden by the investigated.
The two main ways to define the structure of partitions and volumes are the Master Boot Record (MBR) schema and the GUID Partition Table (GPT). The first is used on computers that have BIOS --based firmware (Basic Input/Output System), while the second is on the most modern computers and adopting the UEFI (Unified Extensible Firmware Interface) system.
Among the advantages of using the GPT scheme, it is worth mentioning to be able to count on more than 4 primary partitions (up to 128) and able to use partitions larger than 2 TB. The type of partitioning present in a media can be identified with the aid of the mmls program, present in the TSK, as shown in Figures 20 and 21.

Figure 20. Media with MBR partitioning.

Figure 21. Media with GPT partitioning.
In the sequence, the index tables of the file systems are scrolled through, creating an inventory of the files and directories allocated (including their metadata), the unallocated space, and the slack spaces. This step also recovers the recently deleted files. In general, when a file is deleted, data relative to it is not deleted from the media. What typically happens is that the space used by it is flagged in the table that stores information about each file or directory (FAT or MFT, for example) as available. In this way, it can be used by other objects in the file system.
The goal at the end of this step is to know in detail as many partitions, directories, files, unallocated areas, and slack spaces contained in the media. In possession of this material, the expert may adopt the various techniques and forensic tools available to try to elucidate the facts under investigation.
File Signature
Also known as a magic number, the signature is a sequence of bytes found at the beginning (header) or end (footer) of a file, and that allows you to identify it as being of a certain format. For example, when you come across files containing the 0xFFD8FF and 0xFFD9 values in the header and footer, respectively, the expert will know how to be dealing with files in JPEG format.
The header of a file can be seen using any viewer or hexadecimal editor, such as hexdump, present in the Linux distributions mentioned above. Figure 22 highlights the header and footer of a JPEG file.
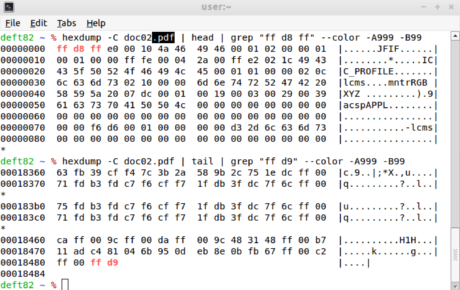
Figure 22. Header of a JPEG arch displayed from the output of the hexdump utility.
Other signatures of interest are shown in Table 6 and a fairly complete relationship can be found on the Gary Kessler Associates website.
Table 6. Signatures of commonly found files.
| HEADER/FOOTER (HEXADECIMAL) | FILE EXTENSION |
| 52 49 46 46 | avi |
| 53 51 4C 69 74 65 20 66 6F 72 6D 61 74 20 33 00 | db (sqlite) |
| D0 CF 11 E0 A1 B1 1A E1 | doc, XLS, PPT |
| 50 4B 03 04 | docx, xlsx, pptx, odt, ods, odp, zip |
| 4D 5th | exe |
| FF D8 FF
FF D9 |
jpg, jpeg |
| 4C 00 00 00 01 14 02 00 | Lnk |
| 1A 45 DF A3 93 42 82 88 | MKV |
| 00 00 01 B3 | MPG, MPEG |
| 25 50 44 46 |
Magic numbers are also useful for identifying files whose extensions are inconsistent with their signature, as the reader must have noted in the previous figure, which showed a file in JPEG format with the PDF extension.
Identifying this type of consistency can be done by programs such as the file, available by default across multiple Linux distributions. Its function is to compare the passed file as a parameter to a database containing multiple predefined signatures. Figure 23 shows this program in action, identifying the various types of different files.
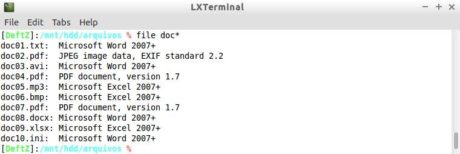
Figure 23. Different file formats identified by the file program.
For Windows systems, an alternative to the file program is called fidentify, which is a distributed utility along with photorec software, which will be handled in the next section. For comparative purposes, Figure 24 shows the same previously displayed files being submitted to the fidentify program.

Figure 24. Different file formats are identified by the fidentify program.
File Carving
File carving or data carving is the process of file recovery carried out without the knowledge of its metadata, through the analysis of the data in its raw form and using the signature of the file. Let's know the operation and usefulness of the technique through the following example: suppose it is necessary to recover images of the JPEG format of a media that had the index of the file system deleted, and there is no information about the metadata of the files. However, because the signature of this type of file is known, we can search the media for those values and extract the data delimited by the header and footer.
However, since we do not live in a perfect world, we find that the file system often does not allocate the disk continually and that few types of files have a footer. For this and other reasons, advanced heuristics have been developed and are already implemented in good file carving solutions. Still, file recovery through this technique does not always represent success. It is also important to note that this technique does not retrieve the metadata of the files, such as their name and the dates associated with them, because this information is maintained by the file system.
Most proprietary forensic applications like EnCase and FTK already bring built-in algorithms of their own for performing file carving. However, the free code community also has great software options that can be used for the same purpose, such as scalpel and PhotoRec. The latter even stood out from its competitors in the recovery of images and videos in tests conducted by NIST in 2014. Figure 25 shows the PhotoRec signature selection screen.
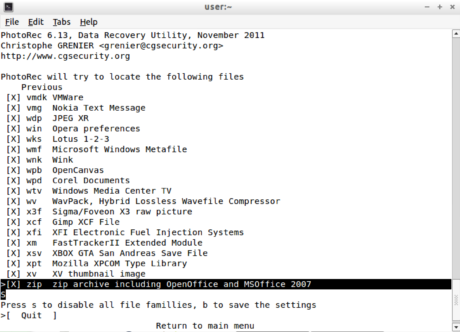
Figure 25. PhotoRec running.
Analysis
After the preservation and extraction of the data comes the time when the intuition, experience, and technical skills of the expert acquire greater relevance. During the analysis phase, the evidence that supports or contradicts the hypothesis raised will be sought. This step has already been described as a methodical search for traces related to the suspected crime or as an intuitive work, which consists first of the identification of the obvious traces, and then conducts exhaustive searches to clarify any remaining doubts.
The conduct of the analysis depends on the nature of the crime. For example, in child pornography verification scans, it is usually searched for image and video files, as well as evidence of their sharing. In turn, scans on equipment that have suffered distributed denial-of-service attacks are often focused on interpreting log logs.
The analysis is full of procedures that the expert can perform as needed. The most common procedures in storage media exams are shown in Figure 26 and presented throughout the section.
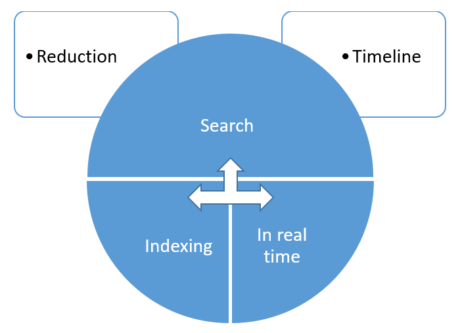
Figure 26. Common procedures during the analysis.
Reduction
Storage media can contain thousands of files. The reduction discards the analysis information unrelated to the scope of the exam, especially known software files, such as operating systems, applications, drivers, and games. Thus, the expert reduces the volume of information to be analyzed and focuses on those possibly relevant.
The reduction is done by comparing the hash of each media file with a database of known files. In addition to the hash, some metadata (such as file name and size) is confronted to minimize false positives from collisions. A second cryptographic hash function can also serve to reduce the likelihood of collisions.
The most commonly used known file database in the forensic community is maintained by NIST through the National Software Reference Library (NSRL) project. As of June 2015, the NSRL database contained more than 42 million known file hashes values. NSRL also has information on known malicious files (e.g. steganography tools and malware) on its basis. Such files, rather than skipped, will be highlighted to the examiner.
The expert also has the option to create their own base of files to be ignored or highlighted. This task can be accomplished through the hashdeep application, which uses, by default, the MD-5 and SHA-256 algorithms. The following commands show how to create a hashes base called "arquivos_ignorados.txt" from the "Windows" directory and how to compare it to files located in the "questioned" directory.
| hashdeep -r Windows\* > arquivos_ignorados.txt
hashdeep -m -k arquivos_ignorados.txt respondents/* |
Keyword Search
Keyword search is the most intuitive process of analysis. It involves comparing a searched term with a dataset. It is often one of the most widely used features of forensic application suites, so developers strive to provide as many features as possible, such as using regular expressions as search criteria. Keyword searches are usually of two types: real-time and indexed.
Real-time search
In practice, it is used when the size of the media submitted to the examination is small, as it tends to be a slow process since the search engine needs to thoroughly scroll through the media image each time a new search is performed.
A simple way to perform a real-time search on text file content is through the grep utility, present in most Unix-like operating systems. Figure 27 gives an example of how to search for the term "dracula" in the directory called "files", displaying the search result at the end.
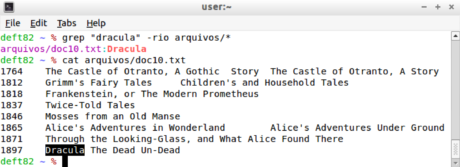
Figure 27. Real-time search example using the grep command.
Indexing
Unlike the previous method, indexing optimizes the search for keywords by creating an index, analogous to the remissive indexes present in the books.
Indexes are auxiliary access structures, used to speed up the search under certain conditions. Thus, when the image file goes through indexing, the search for keywords becomes agile, because it traverses only the index optimally, instead of scrolling through the entire image file. For example, while an index with 10,000 documents provides the result in milliseconds, an exhaustive search on these files can take hours.
Although searching on indexed media is instantaneous, creating an index is a computationally expensive task. Soon, the cost-benefit of running it should be evaluated. Figure 28 illustrates an example index constructed from four files. Didactically, the index shown in the example is a simple structure. In reality, indexes are more complex data structures. Finally, in the index of the figure in question, characters smaller than 4 were discarded, in addition to the numbers.
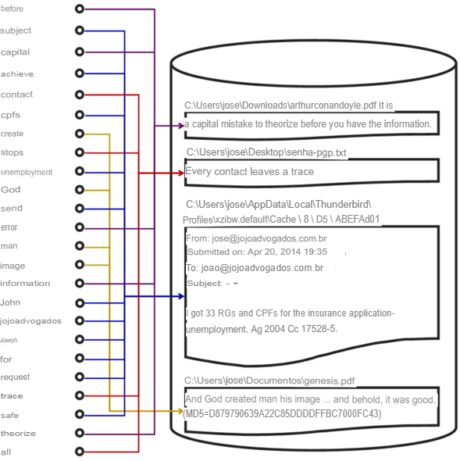
Figure 28. Index example.
Timeline Analysis
Although generic, a common question in forensic examinations is "what happened?". And the answer comes in the form of a story, whose clearest and most concise way of being told is chronological. Timeline analysis provides events in chronological order.
This method obtains from several sources the information needed to reassemble the events. For example, the metadata is obtained from the date of creation and modification of the files; web artifacts are redeemed historical visits to websites; exif data is extracted from the moments when the photographs found in the media were taken.
Other examples of information sources used in timeline analysis are web server and proxy log files (Apache, IIS, Squid); events and the Windows registry; antivirus logs; database of communication programs; and the contents of the syslog. An excellent option for creating timelines is the use of double plaso/log2timeline, which supports most of the examples cited.
Final Considerations
It is important to reinforce that both storage media and analytics tools undergo changes and updates over time. Thus, it is necessary to select the most appropriate tool for the specific case in order to extract the most relevant information required by the situation in kind. Therefore, as or more important as the selection of the tool is the development of technical-investigative skills, essential to good expert work.
References
ALTHEIDE, C.; CARVEY, H. (2011). Digital Forensics with Open Source Tools.
BLUNDEN, B. (2009). The Rootkit Arsenal: Escape and Evasion: Escape and Evasion in the Dark Corners of the System. Jones & Bartlett Learning.
CARRIER, B. (2001). Defining digital forensic examination and analysis tools. Digital Research Workshop II.
CARRIER, B. (2005). File System Forensic Analysis. Addison Wesley Professional.
CASEY, E. (2009). Handbook of Digital Forensic and Investigation.
COSTA, L.R. (2012). Methodology and Architecture for Systematization of the Digital Information Analysis Investigative Process.
HOELZ, B., SILVA, J., MELO, L., KUPPENS, L., RUBACK, M. (2014). Computer Forensics. National Police Academy.
KRUSE II, W. G., & HEISER, J.G. (2002). Computer Forensics: Incident Response Essentials. Addison Wesley Professional.
REITH, M., CARR, C., GUNSCH, G. (2002). An examination of digital forensic models. International Journal of Digital Evidence.
RUSSONOVICH, MARK; SOLOMON, DAVID A.; IONESCU. (2012). Windows Internals Part 2.
On the Web
- https://www.guidancesoftware.com/encase-forensic
- http://accessdata.com/solutions/digital-forensics/forensic-toolkit-ftk
- http://www.x-ways.net/forensics/
- http://www.sleuthkit.org/sleuthkit/
- http://www.sleuthkit.org/autopsy/
- https://github.com/lfcnassif/IPED
- http://nvlpubs.nist.gov/nistpubs/SpecialPublications/NIST.SP.800-88r1.pdf
- http://gnuwin32.sourceforge.net/packages/coreutils.htm
- http://dcfldd.sourceforge.net/
- http://accessdata.com/product-download/digital-forensics/ftk-imager-version-3.4.0.5
- http://www.cftt.nist.gov/
- http://www.caine-live.net
- http://www.deftlinux.net
- http://digital-forensics.sans.org/community/downloads
- https://winfe.wordpress.com
- http://www.garykessler.net/library/file_sigs.html
- https://github.com/sleuthkit/scalpel/
- http://www.cgsecurity.org/wiki/PhotoRec
- http://www.cgsecurity.org/wiki/In_The_News
- http://www.nsrl.nist.gov/Downloads.htm
- https://github.com/log2timeline/plaso
ABOUT THE AUTHORS
Deivison Franco
 Cofounder and CEO at aCCESS Security Lab. Master’s degrees in Computer Science and in Business Administration. Specialist Degrees in Forensic Science (Emphasis in Computer Forensics) and in Computer Networks Support. Degree in Data Processing. Researcher and Consultant in Computer Forensics and Information Security. Member of the IEEE Information Forensics and Security Technical Committee (IEEE IFS-TC) and of the Brazilian Society of Forensic Sciences (SBCF). C|EH, C|HFI, DSFE and ISO 27002 Senior Manager. Author and technical reviewer of the book “Treatise of Computer Forensics”. Reviewer and editorial board member of the Brazilian Journal of Criminalistics and of the Digital Security Magazine.
Cleber Soares
 Information Security enthusiast and researcher, adept in the free software culture. He has worked in the technology area for more than 20 years, passing through national and multinational companies. Has technical course in Data Processing, Graduated in Computer Networks and Post Graduated in Ethical Hacking and Cber Security. Acts as Information Security Analyst and Ad-hoc Forensic Computer Expert. Leader of the OWASP Belém Chapter at the OWASP Foundation and author of Hacker Culture Blog.
Daniel Müller
 Degree in Systems Analysis and Development, Specialist in Computer Forensics, Computer Forensic Investigator working in cases of fraud identification and data recovery. Wireless Penetration Test Specialist, Pentester, and Computer Forensics articles writer. Currently working as Cybersecurity Specialist at C6 Bank.
Joas Santos
 Red Team and SOC Leader and Manager, Independent Information Security Researcher, OWASP Project Lead Researcher, Mitre Att&ck Contributor, and Cybersecurity Mentor with 1000+ technology courses, 50+ published CVEs, and 70+ certifications international. Full member of the 23 chair of the Open Finance Brazil Project and regular author of Hakin9 Magazine and eForensics Magazine. Main Certifications: OSWP | CEH Master | eJPT | eMAPT | eWPT | eWPTX | eCPPT | eCXD.
Author
Latest Articles
 New EditionSeptember 1, 2023Interview with Chirath De Alwis
 OfficialMay 31, 2023Interview with Wilson Mendes
 BlogMay 4, 2023Interview with Israel Torres
 BlogMarch 13, 2023How Deepfake Works
Subscribe
Login
0 Comments